B12 injection self administration How to Give B12 Injections at Home to Yourself · PA Relief
How to Give B12 Injections at Home to Yourself (PA Relief)
If you’ve ever delayed a dose because you didn’t feel confident doing a procedure at home, you’re not alone. In my hands-on work with patients managing B12 deficiency (including pernicious anemia), the biggest barriers usually aren’t the needle—they’re fear of doing it wrong, uncertainty about technique, and not knowing what “good” looks like. This guide walks you through b12 injection self administration with practical, safety-focused steps and the real-world details that reduce mistakes.
Value of this article: you’ll learn how to prepare, choose an injection site, administer a typical intramuscular (IM) injection correctly, and troubleshoot common issues (like bleeding, soreness, or improper needle placement). We’ll also cover what to ask your clinician so your at-home plan fits your specific prescription.
Before You Start: Confirm Your Prescription and Injection Type
Before any injection attempt, confirm the details on your prescription and packaging:
- Route: IM vs subcutaneous (SC). This guide is written for IM technique, since most B12 “shots” for deficiency/anemia are given intramuscularly, but your clinician may prescribe SC in some situations.
- Dose and frequency: e.g., daily loading vs weekly vs monthly maintenance—don’t assume.
- Needle size: your pharmacist or nurse may recommend a specific gauge/length based on your body habitus and injection route.
- Medication appearance: check the vial against the label; don’t use it if it looks abnormal (e.g., unexpected particles or discoloration).
In my experience, the most serious preventable issues come from mixing up route (IM vs SC) or using an incorrect needle length. That’s why I strongly recommend aligning every detail with what your prescriber taught you during your first training visit.
What You’ll Need for b12 injection self administration
Gather everything in advance so you’re not rushing mid-procedure:
- B12 medication vial(s) as prescribed
- Sterile syringe and needle (or injection device) approved for your route
- Alcohol wipes (or swabs) and cotton/gauze
- Sharps container (puncture-resistant) for disposal
- Gloves (optional, but often used for comfort/cleanliness)
- A clean surface and a timer (helps with a calm, repeatable routine)
Product image reference (injection sites):
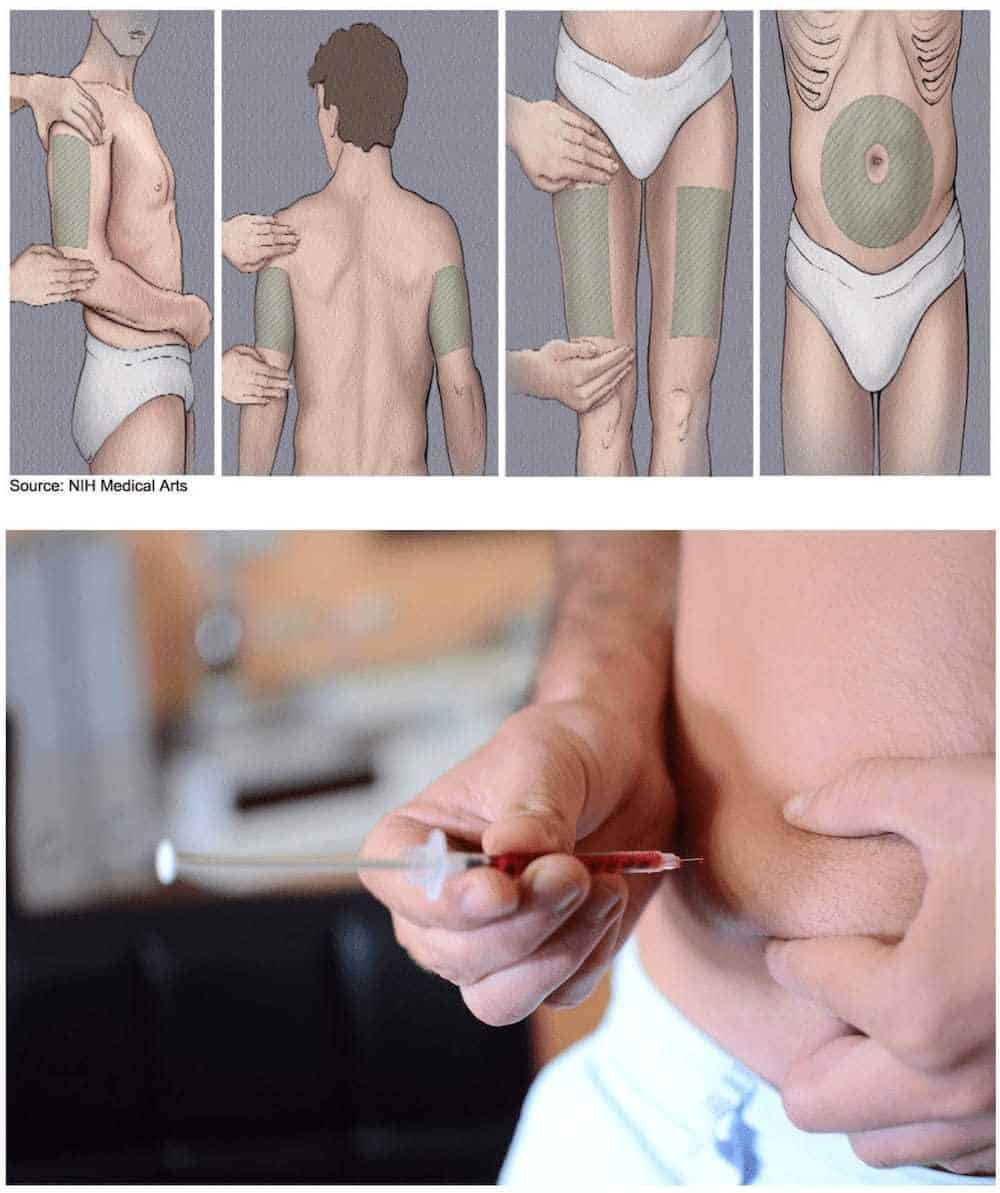
Choose the Right Injection Site (and Rotate)
For IM injections, common sites include:
- Upper outer gluteal area (often used when taught by clinicians)
- Outer thigh (vastus lateralis) (commonly used for self-injection because it’s accessible)
- Upper arm (deltoid) (sometimes used if the dose and needle length are appropriate)
Why rotation matters: repeating shots in exactly the same spot can increase localized irritation, soreness, and scar tissue. Scar tissue can make medication feel “stuck” or cause more discomfort on later doses.
In my practice, I’ve seen that people do best when they pick one self-injection-friendly site (often the outer thigh) and rotate within that region rather than constantly changing locations. Consistency reduces errors while rotation preserves comfort.
Step-by-Step: How to Give a B12 IM Injection to Yourself
Use the clinician instructions you were given, and follow local medication guidance. If something differs from what your nurse taught you, follow your training.
-
Wash hands and set up your supplies.
-
Prepare the medication exactly as directed.
- Wipe the vial top with an alcohol swab.
- Draw up the prescribed amount of B12 into the syringe.
- Remove air bubbles only if your clinician/pharmacist taught you how (technique matters).
-
Select and inspect the site. Choose a spot you were instructed to use. Avoid areas with redness, swelling, bruising, or tenderness.
-
Position yourself comfortably so you can reach the site without awkward angles. Muscle relaxation helps—tense muscles can make the needle feel harder to place.
-
Clean the skin with an alcohol wipe and let it air-dry (don’t blow on it).
-
Administer the injection using the method you were taught for IM delivery:
- Use the correct needle angle and depth per your training (often based on IM guidance and needle length).
- Insert smoothly; try not to hesitate mid-needle placement.
- Once in place, inject the medication steadily.
-
Withdraw the needle safely in a controlled motion.
-
Apply gentle pressure with gauze/cotton if needed. Small bleeding can be normal; persistent bleeding is not.
-
Dispose immediately in a sharps container. Never recap needles unless your clinician specifically instructed a safety method for your device.
What “Correct Technique” Looks Like (So You Can Feel Confident)
In real-world home injection practice, confidence comes from consistent, observable outcomes. After training, these are typical expectations:
- Minimal bruising: some bruising can happen, but repeated large bruises may indicate improper site choice, needle technique, or timing/rotation issues.
- Comfortable medication delivery: steady injection tends to reduce “burning” or resistance. If you often feel significant resistance or severe pain, stop and review technique with a clinician.
- Short-lived soreness: mild soreness for a day is common. Worsening pain over time suggests local irritation or another issue.
One lesson I learned the hard way: when people rush to “just get it over with,” they commonly overthink the needle and then insert at the wrong angle or at the wrong moment. The fix wasn’t a different medicine—it was taking 30–60 seconds to get body position, muscle relaxation, and site cleanup right before needle contact.
Common Problems and Practical Fixes
Problem: Bleeding at the injection site
What to do: apply gentle pressure for a bit longer next time and ensure you’re injecting into the recommended region. Avoid injecting into bruised or irritated skin. If bleeding is heavy or won’t stop, contact your clinician.
Problem: Significant pain or burning
What to do: confirm you’re using the correct needle type/length and the correct route (IM vs SC). Also check whether the medication was prepared per instructions. Stop and get guidance if pain is intense or increasing.
Problem: Large lumps or persistent soreness
What to do: rotate sites more deliberately and avoid injecting into tender areas. If you feel a growing lump, redness spreading, warmth, or fever, seek medical advice promptly.
Problem: Anxiety makes you hesitate
What to do: practice a “dry run” (without needle contact) by setting up supplies, marking your site visually, and confirming your steps. In my experience, repeating the setup ritual reduces panic and improves consistency during the real injection.
Safety Checklist for b12 injection self administration
- Use clean technique every time: fresh wipes, clean hands, organized workspace.
- Use the correct route and needle for your prescription.
- Rotate sites to prevent repeated irritation.
- Dispose properly in a sharps container immediately.
- Know when to get help: worsening redness, swelling, fever, severe pain, numbness, or symptoms that concern you.
If you’re unsure about your exact injection angle/depth or which site you were taught, ask your nurse/pharmacist for a quick refresher. That single clarification can prevent months of discomfort.
FAQ
How do I know whether my B12 injection is meant to be IM or SC?
Check your prescription label and the instructions provided by your clinician or pharmacist. Your training session should also specify the route and injection site. Using the wrong route can change absorption and discomfort, so confirm before injecting.
Can I switch injection sites if I’m doing it myself?
You can usually rotate within recommended options, but don’t change routes. Pick a self-injection-friendly site you were taught (often the outer thigh) and rotate within that region unless your clinician advises otherwise.
What’s normal after a B12 injection at home?
Mild soreness and slight tenderness for a short time can be normal. Some minor bleeding or a small bruise can happen. Seek medical advice if symptoms worsen, persist, or you notice signs of infection (increasing redness, warmth, swelling, fever).
Conclusion: Your Next Practical Step
b12 injection self administration becomes manageable when you treat it like a repeatable process: confirm your route and dose, choose the correct injection site, rotate thoughtfully, and follow a calm step-by-step technique. In my experience, the biggest improvement comes after one focused training review—especially around site selection and the injection method you were taught.
Next step: Before your next dose, write down (or photograph) your prescription route (IM vs SC), your needle size, and the injection site your clinician taught you—then rehearse the setup and positioning at home so you can execute the injection confidently and consistently.
Discussion